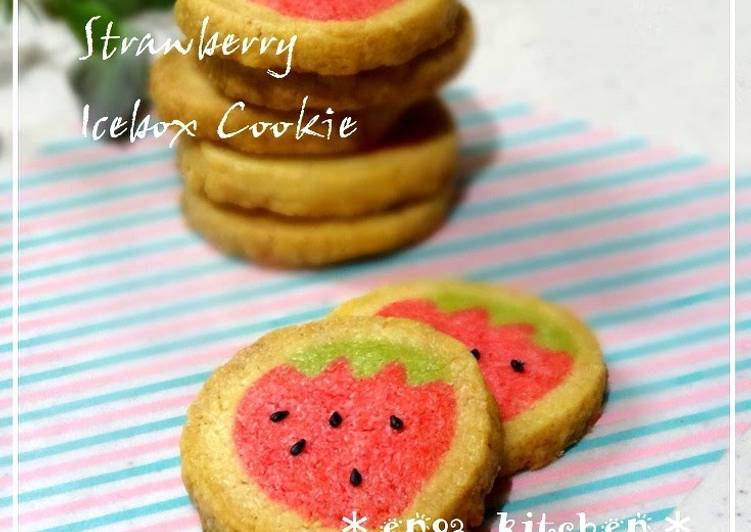
Adorable Strawberry Freezer Cookies. These Strawberry-Shaped Vegan Sugar Cookies are a cinch to make. They're adorable, fun, super delicious, and simple to whip up. They're adorable, fun, super delicious, and simple to whip up.
 Once frozen, transfer to labeled freezer bags. Once frozen, transfer to labeled freezer bags. Remove as many portions as you need and bake, making sure to add additional baking time. You can cook Adorable Strawberry Freezer Cookies using 7 ingredients and 31 steps. Here is how you achieve that.
Ingredients of Adorable Strawberry Freezer Cookies
- You need 170 grams of Cake flour.
- Prepare 70 grams of Raw cane sugar.
- Prepare 120 grams of Unsalted (or salted) butter.
- You need 1 of Egg yolk.
- It's 1 dash of Food coloring (red).
- It's 1 dash of Matcha.
- Prepare 1 of Black sesame seeds for decoration.
If you want slightly flatter cookies, flatten with a fork halfway through. If freezing for later, place dough balls in a tupperware container and store in the freezer. Baking cookies that freeze well is one of our favorite ways to get a head start on the holiday season. Freezing baked cookies now gives you a leg up on holiday prep and ensures Santa has something to snack on.
Adorable Strawberry Freezer Cookies instructions
- These are the ingredients. Oops... I forgot to put the black sesame seeds in the picture. My bad..
- You can use the butter at room temp or you can cover it with plastic wrap and heat up in the microwave for 30~40 seconds at 600 W. This makes it soft. (If you go the microwave route, be careful not to melt it too much).
- Cream the butter..
- Divide the raw cane sugar into halves or thirds and add, mixing each time you add a portion in..
- Once the sugar has been mixed in well, add in the egg yolk and mix well..
- It's well mixed..
- Sift in the flour..
- Using a rubber spatula, mix it in cutting motions..
- Mix it until it looks smooth and crumbly like this picture..
- Divide the dough in half and add the red food coloring to one half. When you pour it in, use a toothpick, so that you don't accidentally add too much..
- Mix it with a cutting motion until the dough comes together and the color is well distributed..
- Take the other half of the dough that you separated and take 1/3 of it out. Mix the 1/3 with matcha powder till it turns green..
- The three colored doughs are done!.
- Roll the red dough up into a rolling pin-like shape. Next, roll up the dough with parchment paper instead of plastic wrap. It's easier to roll it up this way..
- By using two rulers, you can form the dough into a strawberry shape. If you don't have rulers, you can do this with plastic wrap and an aluminum foil box instead..
- Let it rest in the freezer for 10 minutes. Chilling it will make it easier to handle. As shown in the picture, use a kitchen knife to cut two lines in the dough diagonally..
- If it's still diffcult to handle, put back in the fridge for another 5 minutes, then cut 3 slits lenghwise in the dough..
- Cut the matcha dough into 3 long slices..
- Put the strips of green dough into the slits cut in the red dough..
- Roll it up in some parchment paper..
- Now it looks like a strawberry!.
- Take the regular dough now and roll it out. Place the strawberry dough on top and roll it up..
- Roll it up in some parchment paper..
- Chill in the freezer for 20 minutes. If you have time, try to let it chill for 30 minutes. It makes it easier to cut..
- Cut the dough into 4 mm wide cookies. Preheat your oven to 180℃..
- Arrange them on a metal tray and then decorate with the black sesame seeds. Dip a chopstick in water, and then dip it in the bowl of black sesame seeds to pick up individual seeds. It's easier to decorate this way..
- Bake them at 180℃ for 17~20 minutes. Adjust the baking time based on your oven..
- After they have baked for about 8 minutes, take them out and if they look like the picture, cover with some aluminum foil. This prevents them from overcooking..
- Since you've gone to all the trouble of making them look like strawberries, be sure to use aluminum foil! Once they have reached a good color, take them out of the oven..
- Finished. They're so cute! The texture is crispy, and just a bit moist..
- Refreshing. How about some orange freezer cookies? https://cookpad.com/us/recipes/147343-refreshing-orange-icebox-cookies.
Each of these lasts in the freezer up to three months. Place one cutout on the cookie sheet and spread with cream cheese. Use the smaller cookie cutter to cut the center out of the remaining cutouts. Carefully place them on top of each cream-cheese-covered cutout. Adorable, sweet strawberry celebration cookies, bursting with festive rainbow sprinkles..
 with Ewedu and cow tail stew")


")

Post a Comment
Post a Comment